
Ready to give your dresser a whole new vibe without the hefty price tag or hours of work?
Whether you’re looking to inject personality into a dull piece or want to transform it into something uniquely yours, this article has got you covered!
From playful stripes to luxurious finishes, we’re sharing inventive dresser makeover ideas that go beyond the ordinary.
Not only will you discover tips for refreshing tired furniture, but you’ll also unlock creative ways to elevate your space with just a few simple upgrades.
Get ready to turn your dresser into the standout piece your room deserves!
1) Refresh Your Dresser with Wallpaper
Give your dresser a fresh look with wallpaper—it’s easy, stylish, and mess-free! Whether you prefer florals, bold patterns, or a sleek faux-wood finish, wallpaper can transform your old furniture in minutes.
- Choose a peel-and-stick or regular wallpaper that suits your style
- Cut it to fit the drawer fronts or dresser sides
- Smooth out air bubbles while applying
- Seal with Mod Podge for extra durability
It’s a quick, renter-friendly update that you can change anytime for a new look!

2) Create a Striped Dresser
Add a playful touch to your dresser with bold stripes. Whether you go for horizontal, vertical, or diagonal, stripes can make a big impact with minimal effort.
- Choose two or more contrasting colors for the stripes
- Use painter’s tape to mark even lines on your dresser
- Paint within the taped areas and let it dry completely
- Remove the tape carefully for sharp, clean lines
A striped dresser brings modern style and energy to any room. Plus, it’s an easy way to add personality without overwhelming your space!

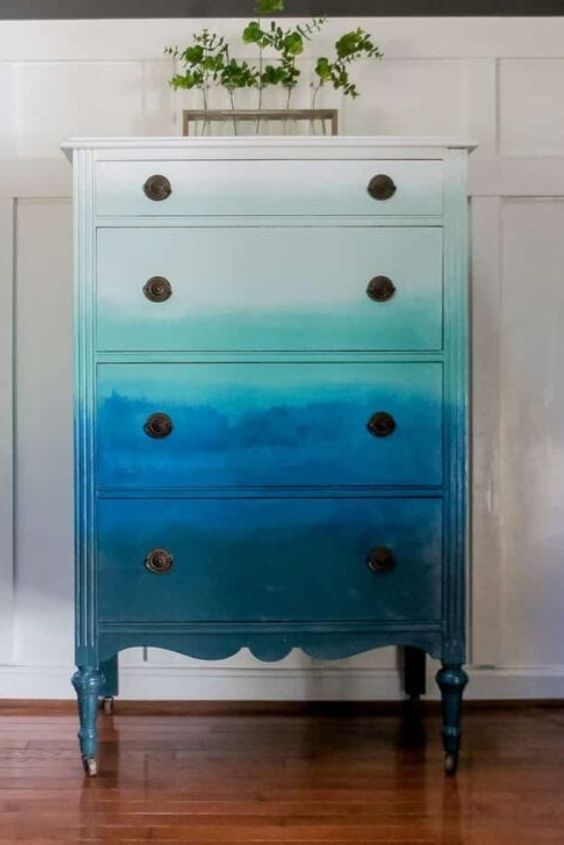
3) Create a Textured Ombre Dresser
Give your dresser a unique and modern twist with a textured ombre effect. This look blends colors seamlessly to add depth and dimension for a stunning and custom piece.
- Start by applying a base coat in the lightest shade
- Gradually blend in darker shades from top to bottom for that ombre effect
- Add texture using a foam roller or brush for a bit of extra flair
- Finish with a protective clear coat for durability
A textured ombre dresser is the perfect way to add a soft gradient while making a bold statement in your room!
4) Repurpose Your Dresser
Turn your old dresser into something totally new with a little creativity! You can repurpose it into anything from a TV stand to a bathroom vanity. The possibilities are endless.
- Remove the top drawers for open shelving or add a countertop for a kitchen island
- Use it as a media console by removing some drawers and adding space for electronics
- Convert it into a bathroom vanity by cutting a hole for a sink and adding a faucet
Repurposing your dresser gives it a second life and adds a unique touch to your home!
5) Geometric Dresser Makeover
Give your dresser a modern, edgy feel with geometric patterns. This clean, bold style works great with both paint and tape for a DIY-friendly transformation.
- Choose a geometric pattern like triangles, chevrons, or squares
- Use painter’s tape to outline your design on the dresser
- Paint each section in different colors or shades for contrast
- Remove the tape carefully for sharp, clean lines
A geometric dresser adds a cool and contemporary vibe that’s sure to be a conversation starter in any room!

6) Refurbish Your Dresser Top
If the rest of your dresser is in good shape but the top looks worn out, refurbishing just the top can give it a fresh new look without a full makeover.
- Sand the top to remove any old finish or scratches
- Apply a new wood stain or paint for a sleek finish
- Add a protective topcoat to keep it looking great
- For extra flair, add a piece of marble contact paper or a wood veneer
A refurbished dresser top is an easy way to update the piece without committing to a full transformation!

7) Create an Artful DIY Dresser
Turn your dresser into a canvas for creativity with an artful DIY makeover! This is the perfect opportunity to showcase your personal style and create a one-of-a-kind piece.
- Use acrylic paints or stencils to add patterns, textures, or even your favorite quotes
- Try a mural-style painting for a bold statement or delicate florals for a soft look
- Experiment with gold leaf, metallic accents, or fabric inserts for added flair
- Finish with a protective sealant to preserve your artwork
An artful DIY dresser is a fun way to add personality and color to any room. Plus, it’s an opportunity to show off your artistic side!

8) Stamped Dresser Makeover
Add some charm and texture to your dresser with a stamped design! This DIY project is an easy way to create a vintage or boho look with minimal effort.
- Use a rubber stamp or create your own with foam or carving blocks
- Dip the stamp in paint and press it onto the dresser surface
- Repeat the pattern across the drawers or along the edges for a cohesive look
- Let the paint dry and add a protective top coat for durability
A stamped dresser is a simple, creative upgrade that gives your furniture a unique, personal touch!

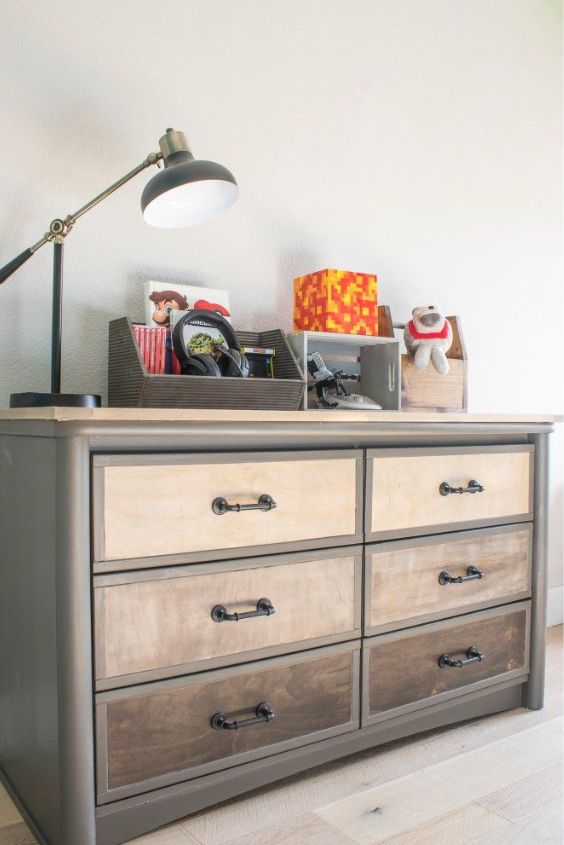
9) Mix and Match Dresser
Get creative with a mix and match dresser—combine different drawer styles, colors, and hardware for a fun, eclectic vibe that makes a bold statement.
- Swap out old drawers for mismatched ones, either in different sizes or designs
- Paint each drawer a different color or pattern for a playful look
- Use various drawer pulls or knobs for an added touch of personality
- Mix up wood finishes with painted and natural wood to balance texture
A mix and match dresser is the perfect way to add personality and style to your space, all while keeping it lighthearted and unique!

10) Stenciled Dresser
Add intricate designs to your dresser with a stenciled pattern for a chic, custom look. It’s an easy and affordable way to elevate your furniture.
- Choose a stencil design that fits your style—florals, geometric patterns, or boho vibes
- Secure the stencil on your dresser and use a sponge or brush to apply paint
- Carefully remove the stencil and repeat the pattern across the surface
- Seal with a topcoat to protect your design
A stenciled dresser is an excellent way to introduce elegance or playfulness into your decor, depending on the pattern you choose!

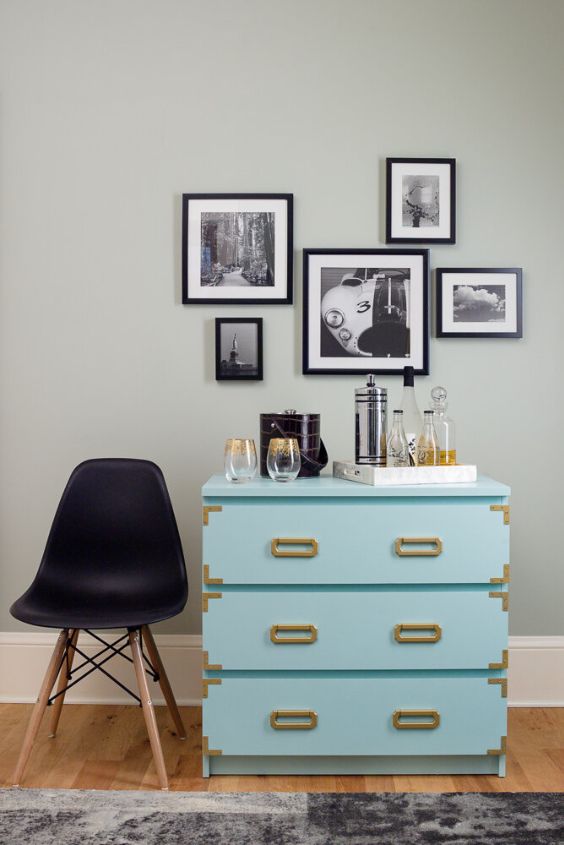
11) Create a Luxurious Dresser
Transform your dresser into a luxurious statement piece with just a few elegant upgrades. Think sleek finishes, glamorous hardware, and rich textures for a high-end look.
- Choose rich, deep colors like navy, charcoal, or gold accents
- Swap out old hardware for gold, brass, or crystal knobs for a touch of opulence
- Apply a glossy lacquer finish for a sleek, polished look
- Add a mirrored or marble contact paper on top for extra sophistication
A luxurious dresser can bring glamour to any space and make your bedroom feel like a five-star suite!

12) Two-Tone Dresser Makeover
A two-tone dresser adds depth and dimension to your furniture with a simple color contrast. It’s a quick and stylish way to bring some modern flair to any room!
- Pick two complementary colors—one for the body and one for the drawers or accents
- Use painter’s tape to create clean, sharp lines where the colors meet
- Paint the body of the dresser with one color and the drawers with the second color
- For an extra touch, use gold or silver hardware to tie the look together
A two-tone dresser is a chic and simple way to update your space with minimal effort but maximum style!

13) Buffet Update
Give your old buffet a fresh, modern twist with a simple update that can completely change its vibe. Whether you’re looking for a rustic, contemporary, or sleek look, this makeover is both practical and stylish.
- Sand down the surface and apply a fresh coat of paint or stain for a new finish
- Swap out the hardware with something more modern or vintage-inspired
- Add a fun wallpaper liner inside the drawers or on the back panel
- Consider adding a glass top or decorative legs for a high-end feel
A buffet update is a quick and budget-friendly way to bring new life to an old piece and make it a standout in your dining room or entryway!

14) Boho Dresser Makeover
Give your dresser a free-spirited, bohemian vibe with natural textures and earthy tones.
- Add a woven or rattan panel to the front of the drawers
- Use warm, neutral paint colors like terracotta or soft greens
- Swap knobs for handmade or ethnic-inspired hardware
- Finish off with some macrame hangings or beaded accents
A boho dresser brings in cozy, laid-back charm with a touch of creativity!

15) Chalkboard Dresser
Turn your dresser into a functional art piece with a chalkboard makeover. It’s perfect for adding a personal touch, whether for messages, doodles, or quotes.
- Paint the drawer fronts or top with chalkboard paint
- Let it dry completely and then add your favorite designs or messages
- Use colorful chalk for a vibrant pop or white for a more minimalist look
- Erase and update whenever you want a fresh design
A chalkboard dresser lets you change things up while adding a fun and interactive element to your space!

16) Mid-Century Modern Dresser
For a sleek, timeless look, update your dresser with mid-century modern vibes. Think clean lines, wood finishes, and retro-inspired hardware.
- Sand and stain the dresser in a warm, rich wood finish
- Replace old knobs with simple, round, wooden pulls
- Consider adding tapered legs to create a more elevated look
- Keep the overall design minimal and clean for a true mid-century feel
A mid-century modern dresser is a classic way to bring retro charm to any room!

17) Industrial Dresser Makeover
If you’re into raw, edgy designs, give your dresser an industrial upgrade with metal, distressed finishes, and rustic charm.
- Sand down the dresser and give it a weathered, distressed look
- Add metal handles or pipe-inspired hardware for a tough, industrial vibe
- Paint it with a matte finish or even use a metallic spray paint for a factory-inspired look
- Consider adding faux concrete or brick wallpaper for the backdrop
An industrial dresser brings a touch of urban sophistication while keeping things down-to-earth and functional.
18) Mirror Dresser
For a touch of luxury, make your dresser shine by adding mirror accents. This update adds an instant glamorous look while reflecting light and making the space feel bigger.
- Apply mirror tiles or mirror contact paper to the drawer fronts or top
- Use silver or gold leafing around the edges for a more polished look
- Swap knobs for crystal or mirrored hardware for extra sparkle
- Add a glossy finish to protect the mirrored surfaces
A mirror dresser can instantly turn a simple piece into a show-stopping focal point in your bedroom or entryway!

Conclusion
Transforming your dresser doesn’t need to be complicated or costly—it’s all about tapping into your creativity. From sleek modern designs to cozy boho vibes, each makeover offers a chance to reflect your personality.
Personally, I love how something as simple as a fresh coat of paint or a playful pattern can completely change the vibe of a room.
Don’t be afraid to experiment and make your dresser a true reflection of you. After all, in design, there are no rules—just endless possibilities!
FAQs
How do I prepare my dresser before starting a makeover?
Proper preparation is crucial for a successful dresser makeover. Begin by thoroughly cleaning the dresser to remove dust and grime. Lightly sand the surface to create a smooth base and help the new finish adhere better. If the dresser has a glossy finish, consider applying a primer to ensure the paint sticks properly. This preparation step is essential for achieving a durable and professional-looking result.
What type of paint is best for a dresser makeover?
Choosing the right paint is vital for durability and finish. Chalk paint is a popular choice due to its ease of use and minimal prep work. However, for a more durable finish, especially for high-traffic areas, consider using furniture-specific paints or mineral paints. These paints are designed to withstand wear and tear, ensuring your dresser makeover lasts longer.
How can I update my dresser without painting?
If you prefer not to paint, there are several alternatives to refresh your dresser:
- Wallpaper Inserts: Apply peel-and-stick wallpaper to the drawer fronts or sides for a quick and stylish update.
- New Hardware: Changing the knobs and pulls can significantly alter the dresser’s appearance.
- Stenciling: Use stencils to add patterns or designs without the need for painting the entire piece.
- Contact Paper: Line the drawers or cover the top with decorative contact paper for a fresh look.
These methods allow you to update your dresser’s appearance without the commitment of painting.
How do I prevent paint from chipping on my dresser?
To prevent paint from chipping, ensure proper surface preparation by cleaning and sanding the dresser before painting. Applying a high-quality primer can also help the paint adhere better. After painting, seal the surface with a clear protective topcoat to add durability. Additionally, avoid placing heavy items on the dresser immediately after painting to allow the finish to cure properly.
Can I use regular household paint for a dresser makeover?
While it’s possible to use regular household paint, it’s not recommended for furniture due to its tendency to chip and wear over time. Furniture-specific paints are formulated to withstand the rigors of daily use, providing a more durable and long-lasting finish. Investing in the right type of paint can significantly enhance the longevity and appearance of your dresser makeover.

